
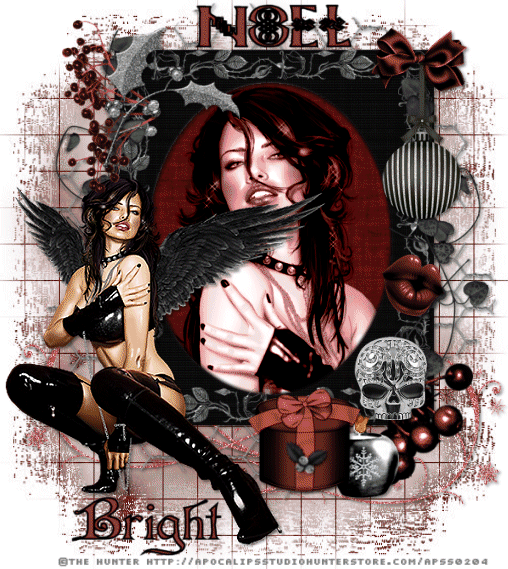
Tube of choice i used The Hunter.
you need a licence to use this art, you can purchase one HERE.
FTU Dark Christmas kit HERE. Thanks Eileen for sharing.
Mask167 HERE. Thank you for sharing.
Wordart HERE.
Font of choice i used Cardinal Alternate.
Best grab yourself a cuppa this is tut is a bit long lol.
The colour i used when colourizing
Hue 255. Saturation 124.
File new 650x650 fill with white,new layer fill with paper6 colourize.
Mask new from image select and apply mask merge mask visable.
Resize element31 paste as new layer on top center of mask drop shaddow.
Resize element45 colourize paste as new layer on top
left bottom corner of mask drop shaddow duplicate image mirror.
Resize element40 paste as new layer on top center.
magic wand click in center selections modify exspand by5
Paste paper 6 as new layer selections invert delete on keyboard.
Resize close up tube image mirror paste as new layer
change blend mode to luminance. drop shaddow frame.
Resize element37 colour grey scale rotate 90% right paste as new layer on top
left corner of frame drop shaddow.image mirror.
Resize element 34 colourize image mirror paste as new layer on
top left of element37 drop shaddow.
Resize element53 colour grey scale paste as new layer
on top element34 drop shaddow.
Resize tube of choice paste as new layer on top bottom left
corner of frame drop shaddow.
Resize element59 paste as new layer on top right corner of frame drop shaddow.
Resize element13 colourize paste as new layer on top
right corner of frame drop shaddow.
Resize element27 colourize image mirro paste as new layer
just beneathelement59 drop shaddow.
Resize element 2 colourize paste as new layer on top bottom corner
of frame drop shaddow.
Resize element 15 paste as new layer on top element2 drop shaddow.
Resize element18 colourize paste as new layer left of element15 drop shaddow
Resize element 19 colour grey scale paste on top center
element 18 drop shaddow.
Resize element 38 paste as new layer on top right element19 drop shaddow.
Open my wordart paste as new layer to top of frame.
Add url copyright and licence. add name place bottom left of frame drop shaddow.
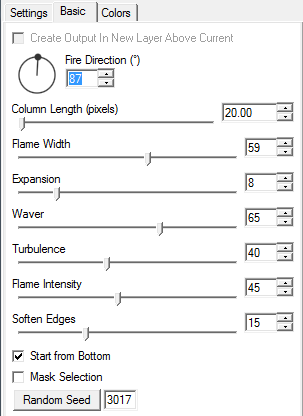
Animation...
Highlight candle fire as settings bellow for 1st layer
then hit random seed once for layers 2 and 3.
select none, highlight close up tube.
colour adjust brightness and contrast
1st layer 10 then repeat 2 more times change contrast by 15 then 20
copy merged paste in animation new animation.
Back to psp undo to undo fire. Repeat as above 2 more times
.for 2nd and 3rd frames paste after current frame.
View animation edit select all edit copy.
paste as new animation. edit select all copy.
Animation reverse frames, edit select all edit copy
back to original tag highlight last frame edit paste in selected frame.
You should end up with 6frames change speed properties to 15
view animation save as.
Hope you enjoyed doing my tut, thanks for trying it.

No comments:
Post a Comment
Note: only a member of this blog may post a comment.